In this Post I like to show you, how to get started with the CraftBeer Pi in new Version 4.0, like a noob, please keep in mind, this version is in „test“ mode and still in development from the main Coder Manuel Fritsch (by the Way: Thank you Manuel for this great Work, and all the contributors of this Project) if you like to spend Manuel a Beer: Donate here
If you like to test and Play, you can download the latest Bits and try how it runs, be aware to use it in Production without full control and personally next to your „Brewery“!
How to start; get some Info’s from the Facebook Group about the discussions: CraftBeerPi | Facebook
There is also a YouTube channel from Manuel: CraftBeerPI – YouTube
Here is the official Webpage: http://www.craftbeerpi.com/ (V3)
Github Repo V4: GitHub – Manuel83/craftbeerpi4
Documentation V4: CraftBeerPi – CraftBeerPi4 (gitbook.io)
I got all the Info’s I used in this Post, from the Facebook Group discussion, the official Documentation Page, and from RaspberryPi site. (Thanks‘ to all, where I get a piece from)
Requirements:
- Raspberry PI 4 (I just tested on this)
- SD Card with minimum of 8GB
- Windows Computer with Terminal installed
- micro HDMI to HDMI adapter (if needed)
- Keyboard and Mice (if needed)
Step by Step Guide:
Go to your Windows and open the Store app to download and install Terminal app (because this is my preferred SSH Terminal):
Then open your Browser and go to Raspberry Pi OS – Raspberry Pi there is a Step by Step for Installing the OS on your SD card:
Prepare Pi-OS to SD-Card:
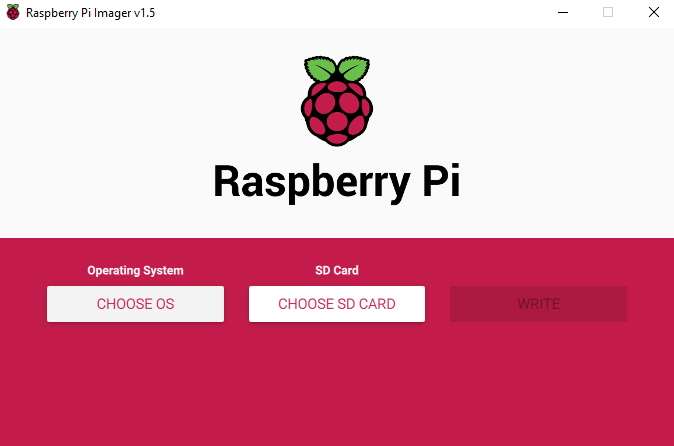
- Download and install Raspberry Pi Imager
- Insert your SD-Card to your Computer
- Open the Raspberry Pi Imager (Graphic 1)
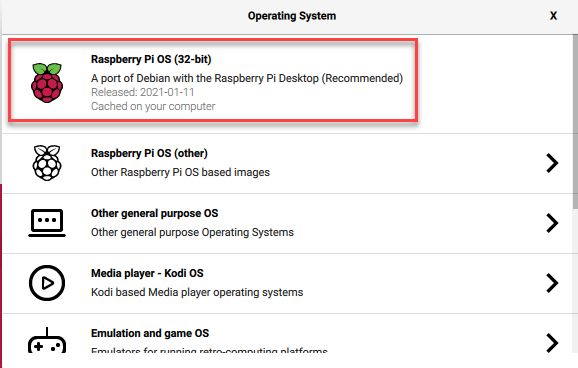
- Select choose OS (Graphic 2)
- Select „Raspberry Pi OS (32-bit) Desktop“ (Graphic 2) I know this is a full version and need mor diskspace, but all we need is pre-installed, like python3.
- Choose your SD-Card that you just inserted at step 1
- Finally press Write
- Your OS-Build will now be downloaded and extracted in the background and written to your SD-Card.
- Close the Raspberry Pi Imager
Enable SSH and WiFi:
- Download this little nice helper: Release Wireless Enhancements · lbussy/headless-pi · GitHub
- (by the way, thank you to Lee Bussy for it!)
- Run the tool with evaluated rights (be sure that the SD-Card is still inserted and visible in Windows Explorer)
- select „enable SSH“ (1.)
- select your Country (2.)
- select your known Networks (3.a) or write it manually (3.b)
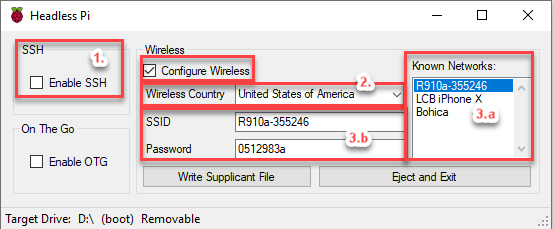
- at the last step click „Write Supplicant File“, this will create a File on the Raspberry OS, and will be used at the first boot, and configure your basic OS settings, like WiFi config and SSH access. (If it asks you where to save the File, select the SD-Card from your Win-Explorer and save it to the root)
Run the Raspberry Pi:
- Get your SD-Card out from your windows Computer
- Put the SD-Card in to your Raspberry PI
- Connect Pi with power and wait a minute
- If you like, connect your Keyboard, Mice and Monitor, but not needed 😉
- After a minute or less your Pi will be online
- Try to figure out the IP address of the Pi in your network
(there are a lot of possibility’s to get the IP-Address from your Pi, it would be to much to explain it here) In my case I connected to ma Wi-Fi Access point and had a look about the connections.
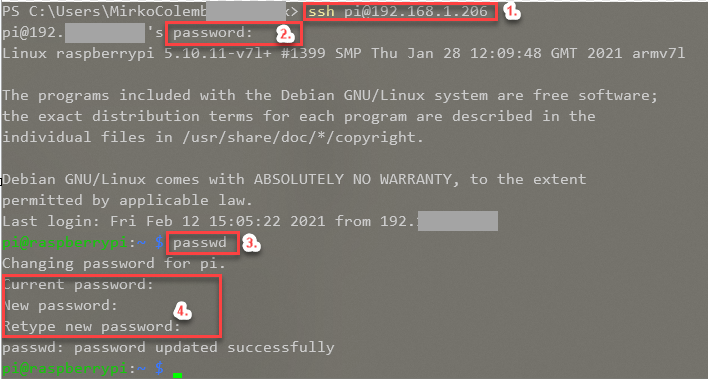
Connect to your Pi with ssh:
- Open your Windows Terminal App
- use command (Graphic 4 (1.)):
ssh pi@raspberrypi- If your Pi will be registered in your DNS, it will work that way, if not, you have to figure out the IP-Address of your Pi and connect with this command:
ssh pi@xxx.xxx.xxx.xxx
*pi stays for the default user*
*Default password is: raspberry (2.)*
*xxx.xxx.xxx.xxx stays for your IP-Address*- when you connect the first time it’s a good idea to change your password
- type the command „passwd“(3.), insert your default Password and type twice your new password (4.)
- Now your password is changed (please remember it ;-))
Now we are ready to Install CraftBeerPi
- You are still connected via Terminal over SSH to the Pi
- First update/upgrade the Pi OS and components
- run the following commands and wait until the Shell says done:
sudo apt-get update
sudo apt-get upgrade- so now you can check what python Version should be installed, use this command
*Note: the new Pi-OS full Desktop Edition, should already have Python Version 3.x preinstalled*
python --versionIt should look like this:

If this is not the Case, and you get Version 2.7.x instead, try
python3 --versionIf you get the version 3.7.3 you have to change the mail Python environment to Version 3.
Please follow this Post here: Python Default Version – Raspberry Valley (raspberry-valley.azurewebsites.net) Thank you to the Facebook Group Community, to highlight and come up with this issue!
If you like, you can also run „pip –version“ to show what python installer version is installed
- Install CraftBeerPi „cbpi“ on your Pi
- Use the following commands
sudo pip install cbpi
cbpi setup
cbpi start- now you can open the Browser and connect to the Web-Service
- type https://xxx.xxx.xxx.xxx:8000 the xxx stays for the IP-Address of your Pi, if you are on your Pi, use „localhost“ instead: https://localhost:8000
- The Port 8000 is a basic config and can be changed if you like

Done, congratulation your cbpi 4 is running and ready to test!
Have fun and enjoy your Beer!
How to Update your CBPI
Update the CraftBeerPi „cbpi“ on your Pi
There is a youtoube Video from Manuel: CraftBeerPi 4 – How to Upgrade the Version – YouTube
If there are some updates, watch the Facebook Group, then you can start updating…
To be honest, I like to copy & past commands and have a step by step. so here we go 🙂
First check the Verision that is currently running on your Pi:
pip list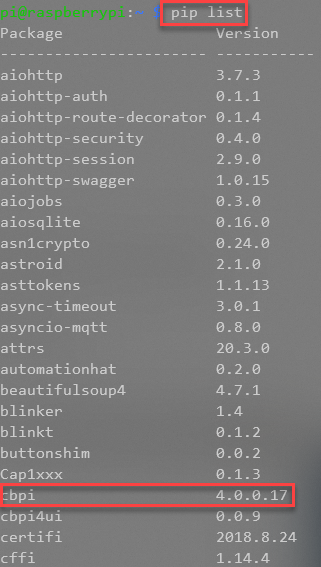
If you read on the Facebook Group; there will be a newer Version, start updating:
- Restart the Pi first, to stop the service
- Use the following commands
sudo reboot - Log in again to the Pi
ssh pi@raspberrypi- start updating
- use this command
pip install --upgrade cbpi
cbpi start- if there are to many changes, you should delete the old config files
ctrl&C (keyboard shortcuts to stop the service)
rm -rf config
cbpi setup
cbpi start
I hope this helps and you have more time to brew a nice beer and enjoy the beer 😉
Please be carefully to use this Instructions, it is as it is, there is no warranty or support, it’s tested in my environment.